Showing posts with label eggless. Show all posts

Tuesday, July 08, 2014

Hungarian Kipfels - Baking Eggless Challenge

For the Baking Eggless Challenge for the month of June, the recipe chosen was Hungarian Kipfels. These are traditional eastern European delicacies and are always made for special occasions such as weddings or birthday celebrations. Basically, for any occasion where family members could gather, create memories and share delicious food ! Sounds familiar ?
In any case, these sweet morsels are made with a rich dough and the filling could be prune or apricot butter, poppy seeds or even cream cheese and walnuts. I definitely wanted to make these because they looked delectable. The original recipe would definitely feed a crowd, but since I was only making it for 4, I had to scale the recipe down.

Original Recipe can be found here - June Meyer's Hungarian Kiffles
Ingredients:
2 C unbleached all purpose flour
1 stick / 8 tbsp butter , room temperature
1/4 tsp salt
1/4 C + 2 Tbsp warm sour cream
1/4 C granulated sugar
1/2 tsp active dry yeast
2 tsp grated orange zest

4 Tbsp walnuts , chopped finely
4 Tbsp granulated sugar

IMAG1612

Method:
1. Add the yeast to 2 Tbsp of warm water and set aside for 5 minutes to proof.
2. Meanwhile, mix the softened butter into the flour mixture until it resembles bread crumbs.
3. Add all the remaining ingredients and mix thoroughly. Knead well until everything is incorporated and the dough turns smooth and soft. If required, add a little lemon juice to bring the dough together. I didnt need to add any extra liquid.
4. Let the dough rise in a warm place until it doubles in volume. (about 2 hours). In a separate bowl, mix the ground walnuts and sugar and keep aside.
5. Once the dough has risen, pinch off lemon sized balls and using your palms and fingers, pat the dough into a circle. You can use a cutting board, or a flat plate to help you enlarge the dough circle.
6. Place a teaspoon of your filling mixture in the middle of the circle. I used homemade apricot butter.
7. Staring from one edge, roll the dough such that the filling is covered.
8. Roll the pastry in the walnut sugar mixture and place seam side down on a greased cookie sheet.
9. Form similar dough packets and place on the prepared sheets.
10. Keep aside in a warm place for about 45 minutes to let the dough rise again.
11. Preheat the oven to 350.
12. Bake the rolls for about 30 minutes until lightly brown.
13. Remove from the oven, cool on a wire rack and then store in an airtight container when completely cooled. Remember to let the pastries cool completely before storing, else the pastry will sweat and make the rolls soggy. Not good eats.

Result:
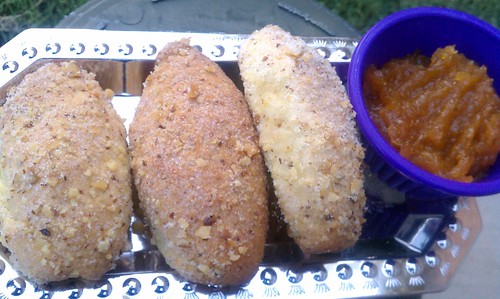
1.  These little rolled up dumplings were seriously delicious. The buttery, flaky crust, the nutty and slightly sweet topping and the sweet and tart apricot butter filling provided a plethora of tastes and textures.
2. It is a very rich sweet, even without using eggs, so I would recommend that they be consumed in moderation!
3. Kids and hubby liked them, so it does appeal to quite a broad palette !
4. For the apricot butter, I essentially followed this recipe , but also added some freshly ground cardamom to lend an Indian touch. The apricot butter can also be used instead of regular jam. It was pretty easy to make and was quite good.

Notes:
1. I could have used a combination of whole wheat pastry flour and all purpose flour to increase the whole grains in the recipe.
2. Also, I think my active dry yeast was past its prime. The dough didnt rise as much as I expected. Please check the expiration date on your yeasts because more often than not, recipes using yeast depend largely on the yeast for the texture and taste of the end product !


Thursday, June 12, 2014

Eggless Mexican Sweet Rolls / Conchas - a Baking Eggless Challenge

Last year, in a spurt of motivation, I joined the Baking Eggless group, spearheaded by the wonderfully talented Gayathri of Gayathri's Cookspot.
Each month, the members selected a challenging recipe, tried the recipes out in their kitchen by replacing the eggs and then posting it on their blogs at the end of the month. It was amazing to see the innovative ways in which each member replaced the eggs and to see how creative they all got.
I got to learn quite a few new recipes and my family was able to enjoy delicious goodies !
Then, I started work after a gap of three years and all bets were off. My routines went helter-skelter, I was hip deep in trying to keep the household as calm as possible, while getting everything done at the same time. As a result, I wasn't able to participate in the baking challenge for a few months. Every month I would see the inspired creations of so many and would feel a little regret, some disappointment. I didn't want to let go in the face of hectic work schedules. So when Gayathri announced the May challenge, I had made up my mind to try the recipe, come what may.
Try I did, although it took me a while to do so and get it posted ! I will admit that its not my best effort and although I am creatively challenged, I could still do better, but on the other hand I am glad that at least I tried !
Onto the recipe  ! This month's challenge was the Mexican Conchas or shell bread.
I decided to make a quarter of the recipe provided and struggled a little to get the measurements right. The original recipe had the ingredients listed by weight, which incidentally is the best way to ensure that your baked goods come out perfect. But, having learnt to bake in the US, I am more used to cups and tablespoons ! Anyhow, I did the math and adjusted a little here and approximated a tough there.
The original recipe can be found here - Wild Yeast


Ingredients:
For Sponge :
1/8 C all purpose flour
1/2 tsp instant yeast
1 T warm water
1 tsp egg replacer powder

For Final Dough:
1/2 - 1 C all purpose flour
3 T granulated sugar
a pinch of salt
1 T softened butter
1/4 C yogurt
2 T water
1 tsp instant yeast
the sponge

For topping:
2 T all purpose flour
2 T sugar
3 T soft butter
flavorings and colors of choice.
(I used a combination of cocoa powder and cinnamon)

Method:
1. Mix all the ingredients for the sponge in a medium bowl.
2. Keep in a warm place for about an hour.
3. Then mix in all the remaining ingredients, except for 1 T of sugar.
4. Knead well. My sponge was thinner in consistency, as a result I needed to add slightly more flour to get the correct consistency for the final dough. If you do need to add more flour, add in small increments, until you get a dough that is slightly sticky and soft.
5. Cover and let rise for about 30 minutes and then refrigerate for 8 - 16 hours.
6. Since I made this during the week and had to go to work the next day, my dough sat in the refrigerator for more than 16 hours.
7. When you are ready to bake the bread, prepare the topping first. Mix all the ingredients for the topping. If you plan to have multiple colors, then divide the dough and then mix in the colors and flavors. Knead lightly.
8. Remove the dough from the refrigerator. Deflate slightly and divide into 4 portions.
9. Roll each piece on the countertop using your palm to form balls.
10. Pinch off a small ball of the topping dough. Flatten it on your hand and cover the dough ball. Flatten it slightly with your hand.
11. Score the top of the topping with a sharp knife, creating designs of your choice.
12. The topping might crack and separate during proofing or baking.
13. Place the bread dough balls on a greased cookie sheet or a baking sheet and let rise in a warm place for about 2.5 to 3 hours.
14. Meanwhile, preheat the oven to 375 degrees.
15. Bake the breads for about 20 minutes
16. The topping should feel set and the bread should be slightly browned. Cool on a rack and enjoy !

Results:
The butter and cinnamon topping gave off a very enticing fragrance while still in the oven.
Taste wise, when eaten while warm, the bread was slightkly sweet and slightly chewy, with the buttery sweet topping a nice contrast.
I am not sure why, but my topping broke and seperated quite a lot when the bread was proofing and baking. Either the consistency was not correct
or I got the thickness incorrect. {sigh} But, again..I realize that I need to put in more time and effort to plan out and execute the recipe, which I will...next month !

Thursday, October 17, 2013

Simple Applesauce Cake

I am always on the lookout for nutritious and simple sides that I can send in my son's lunch box. In all my online searches, applesauce came up a lot. Lots of kids seem to enjoy having applesauce in their lunch boxes. Moms all over the country send applesauce regularly, store bought or homemade, in disposable cups and reusable pouches!
So, a few weeks back, I purchased a pack of natural, unsweetened applesauce from our local grocery store. I had my kids try it out at home before sending it to school and wonder of wonders, they didn't like it! So I had 4 boxes of applesauce and nobody to eat it..
I looked up recipes using applesauce and finally chanced upon this one from Martha Stewart.I halved the original recipe and baked it in a square pan instead of in a bundt pan.
I tried it out and it turned out pretty well. Read on for the recipe !


IMAG1146

Ingredients:
1 C unbleached all purpose flour
½ C whole wheat flour or white whole wheat flour
1 tsp baking soda
½ tsp salt
1 tsp ground cinnamon
1 tsp ground cardamom
½ C butter (1 stick), softened
1 C packed brown sugar
2 Tbs honey
1 flax egg ( 1 Tbs ground flax meal + 3 Tbs water)
1 C applesauce (2 small boxes, if store bought)

Method:
1. Preheat the oven to 350 °(350). Whisk together the flours, salt, spices and baking soda in a large bowl.
2. In another bowl, cream the butter, sugar and honey until light and fluffy. Add the flax egg and beat again until thoroughly incorporated. Beat in the applesauce.
3. Add the flour in increments and gently fold in until just combined.
4. Grease an 8 X 8 square pan. Pour the batter in and smooth the top.
5. Bake in the preheated oven for about 45 minutes until toothpick or skewer comes out clean. Check at around 40 minutes to see if the cake is done.
6. Cool in the pan for 5 minutes and then on a wire rack for 10 minutes.
7. Dust with confectioner's sugar if you want and serve it to your family for a satisfactory snack!

Verdict:
This cake had a nice crust and a pretty crumb and tasted well right out of the oven.
My kids and my husband all loved it and I think I will be making it again. The applesauce cake travels well and is a nice addition to the lunch box or the snack box.
I think I might buy more applesauce just to make this cake!

Tuesday, April 30, 2013

(Home Made From Scratch!) Eggless Tiramisu - Baking Eggless Challenge

I have come to realize, the hard way in fact, that I am more likely to complete any given task or project in a given frame of mind, if I were held accountable for it! I am sure many of us are the same way. Its not that I lack self motivation or the tenacity to stick to something and see it through completion. But I do let things slide if I perceive other tasks or items with a higher priority (for e.g. kids, their activities, their health, you get the idea.. )
To make a long story short, I came across the Baking Eggless group when I was going through some blogs and I thought it was an immensely interesting idea and a relevant one since any and all baking that I do is eggless ! So I joined the group and here is my first challenge - completed (by mere hours to spare , but completed nonetheless , whew ! )

The challenge this month was to make Tiramisu, the Italian pick me up :) , completely from scratch and eggless to boot. I had made Tiramisu before, but had used store bought savioardi and mascarpone cheese. The second time around, I stuck to the basic recipe and kept it simple.

Homemade tiramisu


The mascarpone cheese was pretty easy to make and I was totally surprised by the result. I followed the recipe faithfully and the cheese turned out really well.

Now the all-important lady finger cookies or the savioardi cookies were a different matter altogether...My first attempt turned out pretty badly..the cookies were totally flat and chewy and unusable for a Tiramisu..They weren't inedible, thankfully..I would have hated to see them go to waste !
Then I decided to follow the eggless recipe that most of my fellow baking enthusiasts seemed to have success with and was pretty satisfied with the results...I halved the recipe because I was afraid of not getting the proper results and then seeing them go waste.They were still not as fluffy and light and perfectly shaped as the original version, but I wasn't complaining !


Eggless savioardi

The next step was to make the whipped cream, which was as simple as taking cold heavy cream in a preferably chilled bowl and whipping it with preferably chilled beaters until soft peaks form . I added a little bit of sugar to the cream halfway through the whipping. This helps in getting to the soft peak stage.

Whipped cream

Ingredients:
1 C heavy whipping cream
2 tsp granulated sugar

Method:
Pour the cream into a bowl and using a hand held mixer, whip the cream for at least 3 minutes. Slowly add the sugar and continue whipping until soft peaks form, at least another minute or so.

The mascarpone cheese is mixed thoroughly with sugar. The whipped cream is then gently folded into the cheese in parts, so that the aeration is not lost. This helps in in keeping the final mixture creamy and light.


Whipped cream mascarpone

Last but not the least - the assembling:

I used a 9 X 5 loaf pan, you can use any kind of container, square or round. You might have to cut your cookies to size. Line the container with cling wrap so that its easy to unmould and cut before serving.

Method:

1. Dip the cookies quickly in cooled coffee and place them in a single layer in your container of choice. You can make the coffee to your preferred strength.
2. Using half of the whipped cream - mascarpone mixture, layer it onto the cookies using a flat spoon or a spatula. Cover all the cookies evenly and get the mixture into the corners of the container.
3. Place another layer of coffee dipped cookies onto the layer of cream.
4. Use up the remaining of the cream - cheese mixture to top off the cookies.
5. Sprinkle unsweetened cocoa over the top , cover with foil or cling wrap and refrigerate overnight before unmoulding and serving and devouring :)

Eggless Tiramisu

Notes:
1. The eggless lady finger biscuits will probably not come close to the version with the eggs. They will be delicious and useful in a Tiramisu, but they probably wont be as fluffy and light as the original ones.
2. You can use as many or as less of the cookies as you want. It depends on the size of the container you use.
3. Refrigerating the assembled Tiramisu is highly recommended, because it will help the cookies absorb the liquids and will help the flavors merge.
4. Although there are several components to this recipe and it is definitely a time consuming recipe, it is definitely a must try!
5. We ate the Tiramisu after refrigerating it for 24 hrs. It was really good. Although, I think I should have dipped the cookies a little bit longer in the coffee. I was unsure of whether it would hold up to a longer dipping. The cookies didn't soften all that much, but since they were no delicious as well, it didn't really matter in the end ! 

Saturday, April 20, 2013

Citrusy Nutty Tea Bread

The weather down here in North Dallas has been very weird, fluctuating like a yo-yo. Hot and humid one day and cold, windy and rainy the very next. I don't mind cloudy and rainy days, they offer a perfect reason to snuggle up under a warm comforter with a good book in hand and soulful music playing in the background...and although yesterday was once such day, even good books and beautiful music seemed insufficient...I looked to the kitchen for a rescue and found it in this recipe from MyRecipes. I didn't have all the necessary ingredients at hand, so substituted accordingly. The loaf turned out very well indeed !
It was not as sweet as cake, but was perfect for an afternoon snack with a  steaming cup of coffee. My son enjoyed it in his lunch box too !

Citrus Nut bread

Ingredients:
1¾ C all purpose flour
2 tsp baking powder
½ tsp baking soda
¼tsp salt
¼ tsp nutmeg powder
¼ tsp allspice powder
½C sugar
½ C yogurt
¼ C chopped nuts
3 Tbs milk
3 Tbs oil
3 Tbs apricot pineapple preserves

2 flax eggs (2 Tbs flax meal with 6 Tbs of water)
2 tsp orange rind

Glaze
2 tsp orange juice
½ C confectioner's sugar

Method:
1. Preheat the oven to 350°
2. Combine the flour, baking powder, baking soda, salt and the spices in a medium sized mixing bowl. Mix well.
3. Combine the sugar, yogurt, milk, oil, preserves, flax eggs, orange rind and the nuts.
4. Add the liquid to the dry ingredients and mix in gently until everything is nicely moistened. Do not over mix.
5. Spray a 9 X 5 inch loaf pan ( or an 8 X 4 inch pan) and spoon in the batter evenly.
6. Bake for about 45 minutes.
7. When a wooden pick inserted in the middle comes out clean, remove from the oven and cool in the pan on a wire rack for about 10 minutes.
8. Cool completely on the rack.
9. Mix in the ingredients for the glaze and pour evenly over the loaf.
10. Slice and serve :-)

Nutty tea bread

Notes:
1. I used a combination of white whole wheat and unbleached flour.
2. The original recipe called for buttermilk, which I replaced with sour yogurt.
3. I doubled the quantity of baking powder, since I wasn't using any eggs.
4. The loaf really was very tasty. But I think next time I will use orange marmalade and orange rind for a more citrusy flavor. (There  will definitely be a next time ! )
5. The allspice added a nice spicy note to the bread. If you do not have any, you could use any of your favorite spices.
6. The glaze adds an additional sweetness to the loaf, but is not cloyingly sweet.
7. The loaf can easily be made vegan by using non dairy milk

Thursday, October 11, 2012

Eggless Coconutty Banana Bread


I love to bake..I mean, I am no expert, but I like to try out new recipes, especially when the results are yummy! I usually try and bake something every week, because granola bars and trail mixes can go only so far in satisfying my son's snack appetite.
This last weekend, I wanted to bake up some banana bread, because, you guessed it -- there were some pretty ripe bananas on my counter. I tweaked the recipe that I had for banana muffins and came up with a keeper..I have tried it out twice now and both time the entire loaf was gone within two days!

IMAG0600


Ingredients: 
* 1 C Whole wheat pastry or whole wheat flour
* ½ C all-purpose flour
* 1 teaspoon baking soda
* 1 teaspoon baking powder
* ½ teaspoon salt
* 3 bananas, mashed
* ¾ C sugar
* ⅓ C light sour cream
* ⅓ C coconut oil
* ½ teaspoon ground cinnamon
* ½ tsp ground cloves
* ¼ tsp freshly grated nutmeg
* ⅓ cup packed brown sugar
* ½ C unsweetened coconut
* handful of chopped nuts
* handful of semi sweet chocolate chips (optional)
* a couple of drops coconut essence (optional)

 Method: 
* Preheat the oven to 350°F.
* Mix the flours, the baking soda, baking powder and the spices in a small bowl.
* In another bowl, add the mashed bananas, the oil, sour cream, sugar and essence, if using.
* Mix the wet ingredients really well.
* Add the dry ingredients to the wet, a third at a time and mix in gently.
* Be careful not to beat the batter to death, we want a light loaf, not a brick.
* Once all the flour has been incorporated, mix in the coconut, nuts and chocolate chips.
* Pour into a greased 9 X 5 loaf pan and bake in the oven for 50 - 60 mins or until a toothpick comes out clean.
* Cool the loaf completely before slicing it.

Notes : 
You can substitute yogurt for the sour cream.
I added about 1/2 C of sugar instead of the 3/4 C in the recipe. If you want the bread to be sweeter, then you can add the entire amount.
For an easy vegan version, just replace the sour cream with tofu sour cream or soy yogurt.
The riper the bananas, the sweeter they will be and richer the taste of the bread. You could also use less sugar.

Enjoy!

Friday, September 05, 2008

Yummy Tiramisu (without Eggs and liqueur)

The first time I ever heard the word 'Tiramisu' was in front of the erstwhile Holiday Inn, in Pune (I believe its now the Sun and Sands). It was a cool night, my friends and I were returning home after a movie and my room mate S exclaimed that the Tiramisu at the Holiday Inn cafe was absolutely delicious ! Now I don't exactly remember the sequence of events ( this was some 7-8 years ago ), all I do remember is that I never got to taste the famed Italian dessert, we had to satisfy ourselves with some ever delicious chocolate ice cream instead..
After that I forgot all about it.

Tiramisu is an Italian layered dessert meaning 'pick me up' or 'cheer me up'. (Probably due the coffee/espresso and sugar used in the dessert !!). The original recipe consisted of briefly soaking the special lady finger biscuits (savoiardi - long finger like delicate biscuits which are super absorbent) into espresso (with an optional splash of brandy). These are then layered with a mixture of mascarpone cheese and a custard made with eggs, Marsala wine and sugar. A light sprinkling of cocoa powder or chocolate shavings provides a subtle finish. The whole thing is refrigerated for some time before serving.

I kept coming across the item in most of the menus when I came to the US. I never tried it though. Recently I decided to try it out at home myself...I checked out a few recipes on the web and most of them either had some kind of a liqueur or an egg-based custard. Since I do not use either in my cooking, my recipe options were limited. Eventually I did find one and reproduced it with delicious results !


Ingredients:
20 - Savoiardi (Lady finger biscuits)
16 oz plain mascarpone cheese
1.5 cups strong coffee or espresso (cooled)
1 pint heavy whipping cream
1/3 C powdered sugar
2 tsp vanilla / almond extract
cocoa powder or chocolate shavings
finely chopped nuts (optional)


Method:
1. Prepare the coffee / espresso beforehand and make sure it is cool.
2. Remove the cheese from the refrigerator and make sure it gets to room temparature.
3. Whip the heavy whipping cream in a large container. ( A hand held mixer can do this in minutes)
When the cream starts getting thicker, add about half the amount of the sugar and the vanilla and whip again for a couple of minutes until stiff peaks are formed.
4. Mix the remaining sugar well with the mascarpone sugar. Gently fold in the whipped cream into the mascarpone cheese, in batches if required. This is to be done with a light hand so that the whipped cream doesn't lose all its airiness !Keep aside.
5. Dip the lady fingers into the coffee for 2 seconds on each side. ( This might depend on the type of biscuits used. They should not get too soggy, just enough to soak some of the coffee).
6.Lay them into a 9 X 13 glass dish or any container of your choice. Once the base of the container is covered with the coffee-laden biscuits, pour half of the whipped cream - mascarpone mixture over them and gently spread over the entire surface.
7.An optional step here would be to sprinkle some nuts and chocolate shavings over the first layer.
8.Repeat the process with the remaining lady fingers and the whipped cream mixture.
9. Sprinkle cocoa powder over the whipped cream. Cover with plastic wrap / foil and set into the refrigerator. Keep chilled until time to serve.

Slice into squares and enjoy !!!


Notes:
Since I have not tasted any other kind of Tiramisu, I have no idea how close( or distant !!) it is to the original recipe. I am sure the inclusion of Kahlua (coffee liquer) or an egg based custard might produce superior results. You will have to test that and judge for yourself. But this version, although a very plain and basic one, did not disappoint me. The biscuits were soaked just right and had a melt in the mouth feel to the dish. The taste of the coffee was very pronounced. I could try using espresso or a different flavoured coffee for a slight variation. The whipped cream mixture could also be flavoured differently. That however, is for another post !

Ciao !


Here are a few other Tiramisu recipes:

http://www.heavenlytiramisu.com/recipes.htm
http://365daysveg.wordpress.com/2008/04/21/tiramisu-eggless-way/

Tuesday, November 06, 2007

Fantastic Fruits Series - Bountiful Banana

Bountiful Banana
I always marvel at Nature's repertoire of products...such a vast array of flora and fauna !People spend their entire lives cataloging known species and are always on the quest to find newer ones...For those of us who would still like to witness nature's handiwork without having to travel far and wide , we only have to look into our fruit bowls to get a glimpse of this miracle ! So many fruits...each with a different texture, a different colour, smell and of course a different taste ! Its a plethora of sensory stimuli !
The world is now getting smaller and smaller in more ways than one...All kinds of fruits,both the everyday kind and the exotic ones are available right at your grocery stores and usually at an affordable price too ! Wouldnt it be nice to know a bit about different kinds of fruits, the various uses of the fruits and different types of recipes to go with it ?
I have decided to do just that, experiment with all available fruits and jot it down on my blog, more for my own reference than anything else :)
I will not always go in the alphabetical order ( now where's the fun in that :D , also..since fruit availability doesnt necessarily follow any particular order, I might have to wait for a long time to proceed with my series if I decided to do that ;-)

So to inaugurate this series, I decided to look at the world's favourite fruit - the banana !


Here are some interesting facts about the banana :

  • The banana's origins are traced back to Malaysia. The fruit initially gained popularity in countries like India, China, Madagascar , the Caribbean among other countries, before finally making an appearance in America.
  • The banana plant is not a tree. It is in fact the world's largest herb.
  • A cluster of bananas is called a hand and consists of 10 to 20 bananas, which are known as fingers.
  • Bananas are harvested every single day of the year !
  • Bananas ripen best off the plant.
  • Each banana plant bears only one stem of fruit.
  • Banana plants have been in cultivation since the time of recorded history, thus encouraging horticulturists to believe that this was the first fruit on earth !
  • The word 'banan' is Arabic for finger.
Medicinal Uses :
  • Bananas are high in iron content and can help in treating anemia by increasing hemoglobin production.
  • Bananas are also high in potassium and less salt, thereby making them excellent snacking options for people with high blood pressure.
  • It is the only raw fruit that can be eaten without distress in over-chronic ulcer cases. It also neutralizes over-acidity and reduces irritation by coating the lining of the stomach.
  • The inside of a banana skin can be rubbed over insect bites. It has been known to reduce redness of skin and swelling ! Who knew insect bite creams were available right under your nose ?
  • Bananas are high in B vitamins that help calm the nervous system.
  • Last but not the least, bananas contain tryptophan, a type of protein that the body converts into serotonin. This is a mood enhancer, it makes you relax, improves your mood and makes you happier ! Now who could ask for a better mid morning or afternoon snack ?
I decided to use this super fruit in a moist delicious muffin.
Found the recipe at this site , made a few changes and came up with a keeper !

Banana Crumb Muffin
Serves : 10 fairly big sized muffins


Ingredients:

  • 1 1/2 cups all-purpose flour
  • 1 teaspoon baking soda
  • 1 teaspoon baking powder
  • 1/2 teaspoon salt
  • 3 bananas, mashed
  • 3/4 cup white sugar
  • 1/3 cup yogurt
  • 1/3 cup canola oil
  • 1/2 teaspoon ground cinnamon
  • 1/2 tsp ground cloves
  • 1/4 tsp freshly grated nutmeg
  • 1/3 cup packed brown sugar
  • 2 tablespoons all-purpose flour
  • 1 tablespoon butter
  • a handful of coarsely chopped walnuts
Method:
  • Mix together the flour, baking soda, baking powder,salt and half of the spice mixture (cinnamon, cloves and nutmeg)
  • In another bowl, beat together bananas, sugar, yogurt and oil. (I just mashed the bananas with my fingers and then mixed everything else as well as I could with a wooden spoon).
  • Stir the banana mixture into the flour mixture just until moistened.
  • Spoon batter into prepared muffin cups.
  • In a small bowl, mix together brown sugar, 2 tablespoons flour and the remaining spice mixture. Cut in 1 tablespoon butter until mixture resembles coarse cornmeal. Sprinkle topping over muffins.
  • Bake in preheated oven at 375 degrees for about 20 minutes, until a toothpick inserted into center of a muffin comes out clean.
Verdict
The muffins were amazingly moist without being crumbly.
With a taste of bananas in every bite and the crunch provided by the walnuts, these were a hit at my house :)
If you like bananas, then these are definitely for you!