November's challenge for the Baking Eggless group was to bake a bread - a Slovak Paska bread - a decorative bread baked in the Eastern European regions. It is generally baked for Easter and is a yeast bread made with eggs , butter and milk.
Now, although I have baked with yeast a few times before and am not scared of working with it, I still consider myself a novice when it comes to baking bread. I do enjoy working with the dough and was quite looking forward to baking this bread. But, I procrastinated and didnt bake the bread until just yesterday.
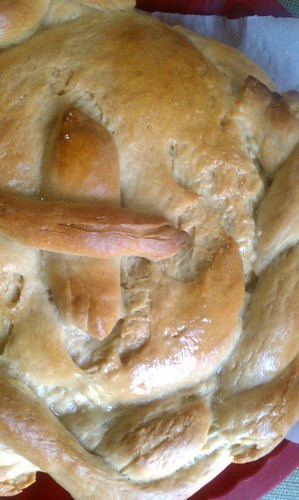
Although the dough turned out beautifully, I underestimated the amount of dough I would need for the decorations. As it is, I am not very creative and had I reserved some time for the baking and researched some decorative methods, the bread would probably have looked a lot better !
But the bread itself was very good and I think I will probably try my hand at this again, if only to make it look prettier. Do take a look here to see the beautiful efforts of my fellow bakers.
Ingredients:
⅔ C milk
2 Tbs sugar
2/3 tsp salt
1 stick butter
1 package active dry yeast
⅓ Tbs sugar
⅓ C warm water
¼ C yogurt (this was my egg replacer)
2½ C - 3⅓ C unbleached all purpose flour
milk to brush on the tops
If the quantities seem a little odd, its because I made one third of the original recipe ! If you want to make more, then just multiply by 3.
Method:
1. Dissolve the ⅓ T of sugar in the warm water and then sprinkle the active dry yeast on top of the water. Keep aside for about 5 minutes, until the yeast blooms and becomes frothy.
2. In an small pan, add the milk, the butter , the remaining sugar and the salt and heat over low to medium heat until the sugar dissolves and the butter melts. Cool until lukewarm.
3. Once cooled, add the yeast mixture, the butter mixture and the yogurt in a large bowl and mix well.
4. Add 2 C of the flour and mix in thoroughly. I mixed everything by hand, but if you have a stand mixer, you could do this step easily in the mixer.
5. Add in more flour, a little at a time until the dough is easily kneadable, but is still a little sticky. I needed about a little more than 3 C.
6. Knead this dough for about 5 - 6 minutes until smooth and elastic.
7. Place the dough in a greased bowl - you could use the same bowl in which you mixed the dough in(if its clean enough).
8. Cover with a clean tea towel and keep in a warm place for about 2 hours until doubled in size.
9. Once the dough doubles, punch down gently to deflate the dough. Knead for a few more minutes.
10. Reserve a little dough and shape the remaining into a round loaf.
11. Prepare a 7 or 8 inch round loaf pan by covering with foil or parchment paper on the bottom and sides, so that the bread has some support while it rises.
12. Place the round loaf in the pan. Use the remaining dough to create decorations.
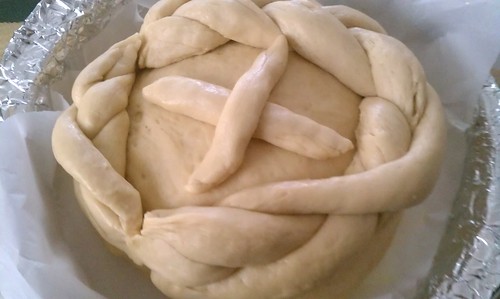
13. I tried to make a braid and a cross for the middle. I fell short of dough :( Let the bread loaf rise again for about 1 - 2 hours, until it doubles in size again.
14. Brush the tops of the loaf with milk. This helps give the bread a nice golden brown color.
15. Preheat the oven to 350 °(350);
16. Bake for about 45 minutes.
17. Cool in the pan for about 5 minutes and then finish cooling on a wire rack.
18. If you want, you can brush the top of the hot bread with melted butter to get a tender crust.
19. Cool completely before slicing and eating with gusto !!
Notes:
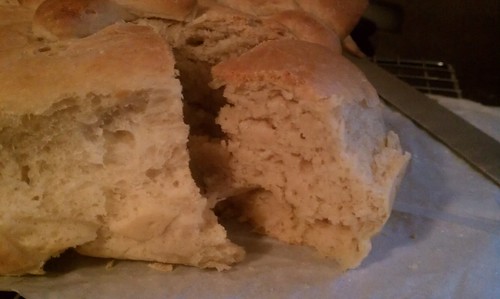
1. Although I was understandably disappointed with my lack of decorative ability, the taste of the bread more than made up for it. The crust was brown and slightly crunchy and the crumb was very soft and buttery.
2. It toasted well and made for a very nice snack with some jam.
3. Other than the two risings, there is very little hands on time that is required, although the more elaborate the decorations, the more time it will take.
4. My husband and kids really like the bread and consumed more than half of it within 3 hours.
5. If there is any leftover bread, you could wrap it up in parchment paper and keep it on the counter top.
It is best if its consumed within a day or so.
Now, although I have baked with yeast a few times before and am not scared of working with it, I still consider myself a novice when it comes to baking bread. I do enjoy working with the dough and was quite looking forward to baking this bread. But, I procrastinated and didnt bake the bread until just yesterday.
Although the dough turned out beautifully, I underestimated the amount of dough I would need for the decorations. As it is, I am not very creative and had I reserved some time for the baking and researched some decorative methods, the bread would probably have looked a lot better !
But the bread itself was very good and I think I will probably try my hand at this again, if only to make it look prettier. Do take a look here to see the beautiful efforts of my fellow bakers.
Ingredients:
⅔ C milk
2 Tbs sugar
2/3 tsp salt
1 stick butter
1 package active dry yeast
⅓ Tbs sugar
⅓ C warm water
¼ C yogurt (this was my egg replacer)
2½ C - 3⅓ C unbleached all purpose flour
milk to brush on the tops
If the quantities seem a little odd, its because I made one third of the original recipe ! If you want to make more, then just multiply by 3.
Method:
1. Dissolve the ⅓ T of sugar in the warm water and then sprinkle the active dry yeast on top of the water. Keep aside for about 5 minutes, until the yeast blooms and becomes frothy.
2. In an small pan, add the milk, the butter , the remaining sugar and the salt and heat over low to medium heat until the sugar dissolves and the butter melts. Cool until lukewarm.
3. Once cooled, add the yeast mixture, the butter mixture and the yogurt in a large bowl and mix well.
4. Add 2 C of the flour and mix in thoroughly. I mixed everything by hand, but if you have a stand mixer, you could do this step easily in the mixer.
5. Add in more flour, a little at a time until the dough is easily kneadable, but is still a little sticky. I needed about a little more than 3 C.
6. Knead this dough for about 5 - 6 minutes until smooth and elastic.
7. Place the dough in a greased bowl - you could use the same bowl in which you mixed the dough in(if its clean enough).
8. Cover with a clean tea towel and keep in a warm place for about 2 hours until doubled in size.
9. Once the dough doubles, punch down gently to deflate the dough. Knead for a few more minutes.
10. Reserve a little dough and shape the remaining into a round loaf.
11. Prepare a 7 or 8 inch round loaf pan by covering with foil or parchment paper on the bottom and sides, so that the bread has some support while it rises.
12. Place the round loaf in the pan. Use the remaining dough to create decorations.
13. I tried to make a braid and a cross for the middle. I fell short of dough :( Let the bread loaf rise again for about 1 - 2 hours, until it doubles in size again.
14. Brush the tops of the loaf with milk. This helps give the bread a nice golden brown color.
15. Preheat the oven to 350 °(350);
16. Bake for about 45 minutes.
17. Cool in the pan for about 5 minutes and then finish cooling on a wire rack.
18. If you want, you can brush the top of the hot bread with melted butter to get a tender crust.
19. Cool completely before slicing and eating with gusto !!
Notes:
1. Although I was understandably disappointed with my lack of decorative ability, the taste of the bread more than made up for it. The crust was brown and slightly crunchy and the crumb was very soft and buttery.
2. It toasted well and made for a very nice snack with some jam.
3. Other than the two risings, there is very little hands on time that is required, although the more elaborate the decorations, the more time it will take.
4. My husband and kids really like the bread and consumed more than half of it within 3 hours.
5. If there is any leftover bread, you could wrap it up in parchment paper and keep it on the counter top.
It is best if its consumed within a day or so.
Bread looks sooo soft ..
ReplyDeleteEvent announcement - Lets cook for Christmas
http://justnotthecakes.blogspot.com/2013/11/event-announcement-lets-cook-for.html
Thanks Shey ! It tasted really good and wasnt as intimidating as it looked !
DeleteIt's looks wonderful! I am drooling over the picture. 2 thumbs up!
ReplyDelete