Within the first few days of my arrival in the US almost 10 years ago, I got to taste the quintessentially American Krispy Kreme doughnut ! With its melt in the mouth soft texture and the sweet glaze, it was quite a treat..Since both TH and I do not subscribe to the 'doughnut as a breakfast' theory, the occasional doughnut remained a treat. But as the years passed, I stopped eating these sweet calorie laden treats because of how it would make me feel immediately after - a greasy feel in the mouth as well in my stomach. The unhealthy processed while flour, the unnecessary sugar and calories just added in the guilt as well. As a result, it has been a really long time since I have had a crispy doughnut !
So when I saw this month's Baking Egg-less challenge - Homemade Egg-less Doughnuts - it was bittersweet and intimidating as well. No one I know had ever tried these before and I am an amateur baker at best !
So one fine day, I made sure I had all the ingredients needed and set out to whip up these delicious morsels at home. I decided to halve the recipe, the original recipe made 18 and I decided that making 8 - 9 doughnuts for a family of 4 was more reasonable. Really, who needed to have 18 of these temptations at hand ?? I followed the recipe exactly, replacing the egg with yogurt and the shortening with butter.
Recipe (Adapted from Allrecipes)
Ingredients:
1 (.25 ounce) envelopes active dry yeast (I used slightly less than 1 envelope)
2 Tbsp warm water (105 to 115 degrees)
¾ cups lukewarm milk
¼ cup white sugar
½ teaspoon salt
¼ C yogurt (replacement for 1 egg)
2.5 Tbsp butter
2.5 cups all-purpose flour
Oil for frying
Method:
1. Sprinkle the yeast over the warm water and let stand for at least 5 minutes. I googled and found out that if you change the recipe( either reduce or increase), you need to change the amount of yeast also accordingly. So if you halve the recipe, then halve the amount of yeast needed. Similarly if you double the recipe, then increase the amount of yeast as well. Although, I also read that one should err on the side of less yeast than more because more yeast causes a change in the texture of the end product..whew !!
2. In a large bowl, mix together the yeast mixture, milk, sugar, salt, yogurt, butter and half the flour. I used unsalted butter instead of shortening, because I don't cook or bake with shortening. But if its something that you use, then that's what the original recipe called for.
3. Mix the ingredients thoroughly. Then add in the remaining flour, a half a cup at a time until the dough stops sticking to the bowl.
4. Knead the dough for about 5 minutes, until smooth. Place the dough in a greased bowl and set in a warm place to rise until double. This takes about 45 minutes to an hour. It also depends on the freshness of your yeast and the temperature of the room. Dough is ready when you tough it and the indentation remains.
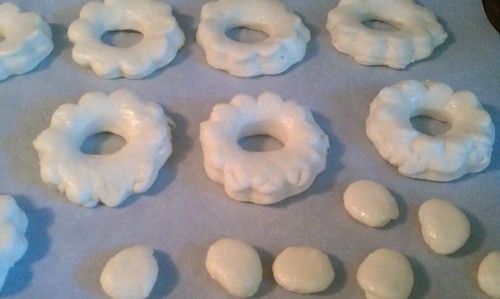
5. Place the dough on a floured surface and gently roll to ½ inch thickness. Cut out the doughnut shapes using a floured doughnut cutter or use a cookie cutter and a milk can top to cut out the holes if you do not own a doughnut cutter.
6. Let doughnuts rise for a second time until double.
7. At this point, the original recipe asks us to deep fry the doughnuts in hot oil. Fry on each side until golden brown and then drain on a wire rack.
I had made the dough in the morning. I was going to bake these little treats and then found out that baked doughnuts are best served hot. I was in a dilemma. I wanted to surprise my son who would get home only in the afternoon. So what was I to do ? I placed the doughnuts on a cookie tray, loosely covered them with cling wrap and placed the entire tray in the refrigerator.
I removed the tray about an hour before I wanted them to go into the oven.
Meanwhile, I preheated the oven at 350°F. Once the oven was hot, I baked these for about 10 minutes, until the top was lightly browned and the bottom was nicely browned as well.
I did reserve a few doughnuts to deep fry as well. The doughnut hole also went into the oil. I am a very reluctant deep fryer. But somethings, one just has to fry !
I had prepared a chocolate glaze beforehand. The recipe can be found here.
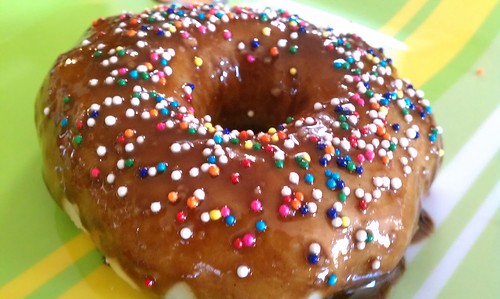
Once all the doughnuts were cooked (baked and fried), I let them cool for a little while and then dipped them in the chocolate glaze.
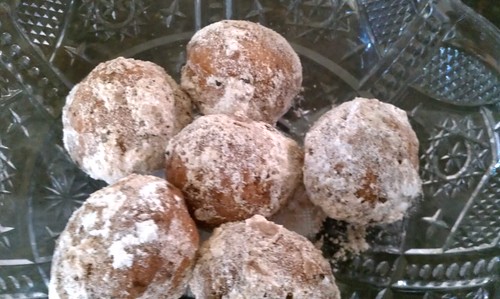
For the fried doughnut holes, I prepared a simple powdered sugar - cinnamon mixture. Once slightly cooled, I rolled the crunchy holes in the sugar and set them aside until serving.
They were pretty delicious.
Once the glaze sets, homemade eggless doughnuts are ready to serve!
You have no dearth of options on the glaze to use for your doughnuts. You could use a simple yet delicious sugar glaze or you could go with a decadent chocolate glaze. Use sprinkles, while chocolate or even nuts to top up your glazed doughnuts and enjoy with family and friends.
Notes:
1.The baked doughnuts were quite soft in texture and tasted really good, without any greasy aftertaste. The fried doughnuts were closer in texture and taste to the store bought ones.
2. The expression on my son's face was reward enough for the effort that it took to bring this dessert to fruition !! He was stunned and delighted to realize that his mom had made doughnuts at home !
So when I saw this month's Baking Egg-less challenge - Homemade Egg-less Doughnuts - it was bittersweet and intimidating as well. No one I know had ever tried these before and I am an amateur baker at best !
So one fine day, I made sure I had all the ingredients needed and set out to whip up these delicious morsels at home. I decided to halve the recipe, the original recipe made 18 and I decided that making 8 - 9 doughnuts for a family of 4 was more reasonable. Really, who needed to have 18 of these temptations at hand ?? I followed the recipe exactly, replacing the egg with yogurt and the shortening with butter.
Recipe (Adapted from Allrecipes)
Ingredients:
1 (.25 ounce) envelopes active dry yeast (I used slightly less than 1 envelope)
2 Tbsp warm water (105 to 115 degrees)
¾ cups lukewarm milk
¼ cup white sugar
½ teaspoon salt
¼ C yogurt (replacement for 1 egg)
2.5 Tbsp butter
2.5 cups all-purpose flour
Oil for frying
Method:
1. Sprinkle the yeast over the warm water and let stand for at least 5 minutes. I googled and found out that if you change the recipe( either reduce or increase), you need to change the amount of yeast also accordingly. So if you halve the recipe, then halve the amount of yeast needed. Similarly if you double the recipe, then increase the amount of yeast as well. Although, I also read that one should err on the side of less yeast than more because more yeast causes a change in the texture of the end product..whew !!
2. In a large bowl, mix together the yeast mixture, milk, sugar, salt, yogurt, butter and half the flour. I used unsalted butter instead of shortening, because I don't cook or bake with shortening. But if its something that you use, then that's what the original recipe called for.
3. Mix the ingredients thoroughly. Then add in the remaining flour, a half a cup at a time until the dough stops sticking to the bowl.
4. Knead the dough for about 5 minutes, until smooth. Place the dough in a greased bowl and set in a warm place to rise until double. This takes about 45 minutes to an hour. It also depends on the freshness of your yeast and the temperature of the room. Dough is ready when you tough it and the indentation remains.
5. Place the dough on a floured surface and gently roll to ½ inch thickness. Cut out the doughnut shapes using a floured doughnut cutter or use a cookie cutter and a milk can top to cut out the holes if you do not own a doughnut cutter.
6. Let doughnuts rise for a second time until double.
7. At this point, the original recipe asks us to deep fry the doughnuts in hot oil. Fry on each side until golden brown and then drain on a wire rack.
I had made the dough in the morning. I was going to bake these little treats and then found out that baked doughnuts are best served hot. I was in a dilemma. I wanted to surprise my son who would get home only in the afternoon. So what was I to do ? I placed the doughnuts on a cookie tray, loosely covered them with cling wrap and placed the entire tray in the refrigerator.
I removed the tray about an hour before I wanted them to go into the oven.
Meanwhile, I preheated the oven at 350°F. Once the oven was hot, I baked these for about 10 minutes, until the top was lightly browned and the bottom was nicely browned as well.
I did reserve a few doughnuts to deep fry as well. The doughnut hole also went into the oil. I am a very reluctant deep fryer. But somethings, one just has to fry !
I had prepared a chocolate glaze beforehand. The recipe can be found here.
Once all the doughnuts were cooked (baked and fried), I let them cool for a little while and then dipped them in the chocolate glaze.
For the fried doughnut holes, I prepared a simple powdered sugar - cinnamon mixture. Once slightly cooled, I rolled the crunchy holes in the sugar and set them aside until serving.
They were pretty delicious.
Once the glaze sets, homemade eggless doughnuts are ready to serve!
You have no dearth of options on the glaze to use for your doughnuts. You could use a simple yet delicious sugar glaze or you could go with a decadent chocolate glaze. Use sprinkles, while chocolate or even nuts to top up your glazed doughnuts and enjoy with family and friends.
Notes:
1.The baked doughnuts were quite soft in texture and tasted really good, without any greasy aftertaste. The fried doughnuts were closer in texture and taste to the store bought ones.
2. The expression on my son's face was reward enough for the effort that it took to bring this dessert to fruition !! He was stunned and delighted to realize that his mom had made doughnuts at home !
The donuts look so lovely Chhaya. Must have been a nice treat for your son..
ReplyDeleteLovely doughnuts. I agree the expression on the kids face when they realize that you have made their favourite treat is priceless.
ReplyDelete